
Size
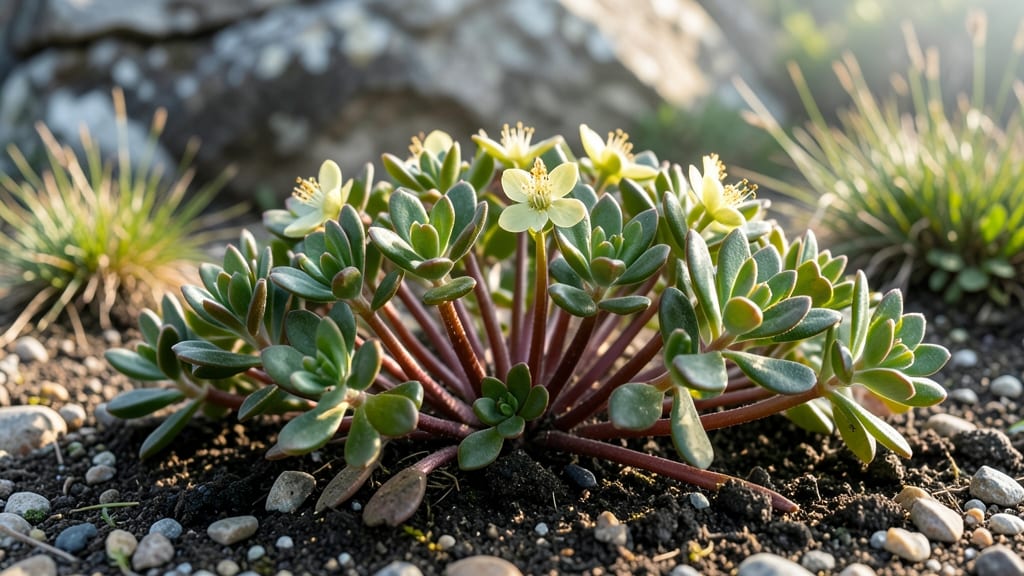
Growing rhodiola rosea means adding a cold-hardy, medicinal powerhouse to your garden that thrives where most perennials struggle. 🌱 I’ve watched mine push through snowpack in Zone 4, its bright yellow blooms signaling spring’s arrival weeks before tulips.
This isn’t just another pretty plant—it’s the adaptogen that boosts resilience, both in the soil and in your body.
The secret to success starts with well-draining soil—rhodiola hates soggy roots—and a spot with full sun to partial shade. Plant seeds in early spring or take cuttings from established plants; both methods work, but cuttings root faster.
Water lightly after planting, then let nature take over—this drought-tolerant perennial stores water like a champ once established.
By summer’s end, you’ll see thick, fleshy roots perfect for harvesting (or leaving in the ground to multiply). The plants reward patience with vibrant blooms and a bushy, almost impenetrable growth habit that crowds out weeds.
It’s the kind of plant that makes you feel like you’re growing medicine, not just decor.
Perfect for rocky slopes, alpine gardens, or even container culture—rhodiola adapts to what most plants would avoid. Just avoid overwatering and give it space to spread. Here’s how to get started without the guesswork.
📚 In This Guide
- What you need
- Instructions
- Tips and common mistakes
- Wrapping up and next steps
What you need
- ● Rhodiola rosea seeds or cuttings: Seeds: 10–20 (start indoors for best results)
- ● Cuttings: 2–3 healthy stems (4–6 inches long, with nodes)
- ● Growing medium: Well-draining soil mix: 50% potting soil + 50% perlite or coarse sand
- ○ Optional: Add a handful of compost for nutrients
- ● Containers: Seedlings: 3–4 inch pots (for indoor starting)
- ● Mature plants: 12–18 inch pots or direct garden bed (full sun, rocky soil preferred)
- ● Watering can or spray bottle: For gentle hydration (avoid waterlogging!)
- ● Grow lights or sunny windowsill: If starting indoors (12–16 hours of light/day)
- ● Pruning shears: For trimming stems (sterilize with rubbing alcohol)
- ○ Rooting hormone (optional): Speeds up cutting propagation
- ● Mulch (gravel or pebbles): Mimics natural rocky habitat (prevents rot)
- ● pH test kit: Ideal soil pH: 5.5–7.0 (slightly acidic to neutral)
- ○ Cold frame or greenhouse (optional): Extends growing season in colder climates
Step-by-step guide to growing Rhodiola rosea
This hardy alpine plant thrives where most perennials struggle—here's how to cultivate it successfully.
🌱 Step 1: Select the Right Location and Prepare the Soil
Rhodiola rosea demands full sun—at least 6-8 hours daily—and well-draining soil that mimics its rocky alpine habitat. I always choose a site with south-facing exposure where temperatures stay between 50-75°F during growing season. The soil must be sandy or gravelly—never heavy clay, which causes root rot.
Amend native soil with coarse sand or perlite to improve drainage. Mix in a thin layer of compost (no more than 10%) to provide nutrients without compacting the mix. Test drainage by digging a 6-inch deep hole, filling it with water, and watching how quickly it drains—if it takes longer than 30 minutes, add more sand.
🪴 Step 2: Plant Rhodiola Rosea in Late Spring or Early Summer
Plant 4-inch pots (one per location) or bare-root divisions after the last frost when soil temperatures reach 55°F. Space plants 12-18 inches apart—they spread slowly but form dense clumps over time. Dig a hole twice as wide as the root ball but only as deep as the container's base.
Gently loosen roots if pot-bound, then place the plant so the crown sits just below soil level. Backfill with amended soil, pressing lightly to eliminate air pockets. Water deeply but avoid soggy soil—Rhodiola's roots rot quickly in saturation. Mulch with 1 inch of gravel (not organic mulch) to prevent moisture retention.
☀️ Step 3: Provide Minimal Care During the Growing Season
Rhodiola is drought-tolerant once established, but young plants need consistent moisture during their first year. Water once weekly (or when the top 2 inches of soil feel dry)—never let it sit in standing water. Overwatering is the fastest way to kill this plant, so I always check soil moisture before watering.
Apply a balanced, low-nitrogen fertilizer (like 5-5-5) once in early spring and again after flowering. Too much nitrogen encourages leafy growth at the expense of root development, which is where Rhodiola's medicinal compounds concentrate. Watch for pale green leaves—a sign of over-fertilization—and flush the soil with water immediately.
✂️ Step 4: Harvest and Divide Every 3-4 Years
Harvest roots in early fall (September-October) when the plant's energy shifts underground. Use a clean spade to dig carefully, shaking off excess soil to inspect for damage. The best roots are thick, fleshy, and golden-yellow—discard any that are shriveled or blackened.
Divide clumps in early spring before new growth begins. Separate roots with a sterilized knife, ensuring each division has 3-5 shoots. Replant divisions immediately in fresh, well-draining soil. This prevents overcrowding and rejuvenates the plant—Rhodiola often declines after 5-6 years without division.
⏰ Step 5: Prepare for Winter Hardiness
Rhodiola survives USDA zones 3-7 with no winter protection needed. Its cold tolerance comes from natural antifreeze compounds! In extreme winters (below 0°F), add a 2-inch layer of gravel mulch to insulate roots. Avoid organic mulch—it retains moisture and invites rot.
Prune dead or yellowed foliage in early spring, but leave healthy stems until after flowering. The plant's bright yellow flowers (appearing in late spring) attract pollinators and signal successful growth. If flowers fail to appear, your plant may need more sunlight or better drainage.
Tips & tricks for growing thriving Rhodiola rosea
These practical insights will help you avoid the most common pitfalls when cultivating this resilient alpine perennial.
Location and Soil Secrets: For the 6-8 hours of full sun requirement, prioritize south-facing slopes or raised beds—they naturally provide better drainage than flat ground. I've found that adding 1 part coarse sand to 3 parts native soil creates the ideal gravelly texture without compacting. Test your drainage thoroughly: if water doesn't drain within 30 minutes in your test hole, mix in more perlite or even crushed granite. The goal is to mimic its rocky alpine habitat as closely as possible.
Planting Precision: When planting your 4-inch pots or bare-root divisions, resist the urge to bury them too deeply. The crown should sit just below soil level—any deeper risks suffocation, while too high exposes roots to drying. I use a small stick to mark the original soil line on the pot before planting, which serves as my reference point. For container growing, ensure pots have drainage holes and use a sandy mix with 50% perlite to prevent root rot.
Watering Wisdom: The once weekly watering guideline assumes average conditions, but your actual needs depend on rainfall and soil type. I check moisture by inserting my finger 2 inches deep—if it feels dry, water thoroughly until it runs from the drainage holes. The key is consistency: Rhodiola's roots are particularly sensitive to moisture fluctuations, so aim for even dampness rather than occasional deep soakings. In containers, watering may be needed every 3-4 days during summer heat.
Harvesting and Division Strategy: For maximum adaptogenic benefits, harvest roots in early fall when they're at peak potency. I wait until after the first frost to ensure the plant's energy has fully shifted underground. When dividing clumps in early spring, make sure each section has 3-5 shoots—this ensures strong regrowth. Sterilize your knife with rubbing alcohol between cuts to prevent disease transmission, which is especially critical for this slow-growing perennial.
Pro Tips for Grow Rhodiola Rosea
- These practical insights will help you avoid the most common pitfalls when cultivating this resilient alpine perennial.
- Location and Soil Secrets: For the 6-8 hours of full sun requirement, prioritize south-facing slopes or raised beds—t...
- Planting Precision: When planting your 4-inch pots or bare-root divisions, resist the urge to bury them too deeply. T...
Frequently asked questions
about growing Rhodiola rosea—your go-to guide for troubleshooting, timing, and tips!How long does it take for Rhodiola rosea to grow from seed?
Patience is key! From seed, Rhodiola rosea typically takes 2–3 years to mature fully. The first year focuses on root development, while the second year produces small leaves. By year three, you’ll see robust growth and potential flowering. Pro tip: Start indoors 6–8 weeks before your last frost for a head start!
Can I grow Rhodiola rosea in a pot?
This cold-hardy plant thrives in containers with well-draining soil and partial sun. Use pots at least 12 inches deep to accommodate its roots. Just ensure they’re placed in a location with good airflow to prevent rot. Bonus: Potted Rhodiola is perfect for balconies or patios in colder climates!
When is the best time to harvest Rhodiola rosea?
Harvest the roots and leaves in late spring or early summer, just before flowering. For roots, dig carefully in fall after the first frost for maximum potency. Warning: Avoid over-harvesting—leave at least ⅓ of the root in the soil to ensure regrowth!
What if my Rhodiola rosea isn’t growing?
Check these common issues:
- Too much water: Rhodiola hates soggy soil—ensure it’s well-draining.
- Not enough sun: It needs 4–6 hours of sunlight daily.
- Poor soil: Amend with sandy or gravelly soil for optimal growth.
- Pests: Watch for aphids or spider mites—spray with neem oil if needed.
Are there alternatives to growing Rhodiola rosea?
If you’re after adaptogenic benefits but want easier options, consider:
- Ginseng (Panax ginseng): Slower-growing but potent.
- Ashwagandha (Withania somnifera): Thrives in warmer climates.
- Astragalus (Astragalus membranaceus): Drought-tolerant and hardy.
Wrapping up and next steps
Growing Rhodiola rosea is a rewarding journey—this cold-hardy perennial not only thrives in tough conditions but also offers powerful adaptogenic benefits to boost your well-being. With the right soil, sunlight, and patience, you can cultivate this resilient plant right in your garden or even indoors.
Whether you're a seasoned gardener or just starting out, every step brings you closer to harvesting your own supply of nature’s stress-reliever!
Ready to take the next step? Start small—plant a few cuttings this season and monitor their progress. Once established, you can expand your garden and even share cuttings with fellow plant enthusiasts. Your future self (and maybe even your stress levels!) will thank you. 🌱✨